![3D Mesh Trails for Gamemaker: LemonTrail [BETA]](https://img.itch.zone/aW1nLzIwNDU2MjcyLnBuZw==/original/xsCzd%2B.png)
3D Mesh Trails for Gamemaker: LemonTrail [BETA]
LemonTrail Blender Extension: Quick Rundown
This included extension (lemontrail_exporter.zip) allows you to build and export custom LemonTrail data from mesh objects in Blender.
Installation
To install the LemonTrail Exporter extension:
- extract the LemontrailPackage.zip and find the file "lemontrail_exporter.zip".
- Open Blender and go to
Edit > Preferences. - In the Preferences window, go to the
Add-onstab. - Click the V arrow in the top right, then
Install From Disk...and select thelemontrail_exporter.zip file.
Using the Extension
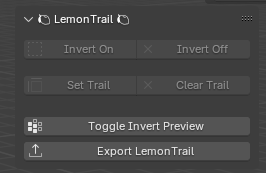
Once the LemonTrail Exporter extension is installed and enabled, you can access its features from the LemonTrail panel of the 3D Viewport sidebar.
1. Invert Radius On/Off
This is useful for instances where you want your trail's normals to face inwards instead of outwards, usefule for all kinds of effects. To invert the selected vertices:
- Select the mesh object you want to modify.
- Enter Edit Mode by pressing
Tab, - Select your desired faces.
- Go to the
LemonTrailtab in the 3D Viewport sidebar. - Click
Invert Onto invert the radius of the selected vertices. - If you need to revert the inversion, click
Invert Off.
2. Set and Clear Trail
To set an edge to emit trail geometry:
- Select the mesh object you want to modify.
- Enter Edit Mode by pressing
Tab. - Select your desired Edges.
- Go to the
LemonTrailtab in the 3D Viewport sidebar. - Click
Set Trailto mark the selected vertices for trail spawning. - Click
Clear Trailto remove it.
3. Toggle Invert Preview
To toggle the visibility of the InvertRadius vertices in the instance that you've forgotten if you've inverted it already:
- Select the mesh object you want to preview.
- Go to the
LemonTrailtab in the 3D Viewport sidebar. - Click
Toggle Invert Previewto preview which vertices are set to inverted. They will show up red. - Control + Tab to exit this mode. (this will be improved in the future)
4. Export LemonTrail
To export the selected LemonTrail for use in Gamemaker:
- Select the mesh object(s) you want to export. You can select multiple at a time.
- Go to the
LemonTrailtab in the 3D Viewport sidebar. - Click
Export LemonTrail. - Choose the file location and name, then click
Export.
5. Controlling your profile
To control how your trail spawns, you need to define custom "normals", which is far more difficult to do in Blender than one would like. So I created a simple workaround.
The blue edges are trail spawners, each of the lines coming off of it control the normal of each vertex (the direction in which to push and pull the trail along it's profile), and the length that the adjacent vertices will adhere to when creating the trail. the longer your lines are coming off of the trail edges, the longer the trail will be at that edge. If you want your trail to come to a closed point, just make sure your extruded edges join up with each other.
I'll go over this in more detail very soon, but a good rule of thumb is to extrude your edges, then merge them into the center. This will give you a clean, fully closing mesh trail.
Comments
Log in with itch.io to leave a comment.
Hiya! I have the blender extension working (seems to require blender v4 or later). I am not sure exactly what the trails I should make would look like. Is there any way you could make some sample assets, like the ones used in the demo, available to users as part of the downloads? Best way to learn is to study a finished thing :)
Sure. I'm working overtime lately, but will update when i find the time. Thanks for your support!